A successful land drainage project is all about preparation. Before any machinery rolls onto the site, you need a solid plan. This plan should cover everything from assessing the ground to designing the system and getting the right permissions. The goal is a detailed blueprint that considers your soil type, the land’s slope, and local rules. This ensures water is channelled away from problem spots for good.
Planning Your Land Drainage Project

A successful installation is won or lost before you start digging. A robust plan is your most valuable tool. It helps you avoid costly mistakes and ensures the system will work for years to come. This initial groundwork is vital, especially when you’re up against the heavy, stubborn clay soils common across Norfolk and Suffolk.
This phase is about understanding the problem inside and out. You need to map the land’s contours and make sure your proposed solution is both effective and compliant. If you are new to this, it’s worth reading a pro’s guide to weeping tile installation to understand the details.
Conducting a Thorough Site Assessment
Your first job is to get your boots on the ground. Walk the site and pinpoint where water is causing problems. You are looking for the tell-tale signs: soggy ground, puddles that linger for days after rain, or patches where plants refuse to grow. These visual clues are your starting point.
Next, you must figure out the natural “fall” of the land. Water only moves downhill, so your drainage system must work with gravity. Using surveying equipment, like a basic laser level, helps you map the high and low points accurately. This is critical for plotting the route and depth of your trenches.
Understanding Your Soil with a Percolation Test
The type of soil you have determines how fast water can drain away. In Norfolk and Suffolk, we mostly deal with heavy clay, which is notoriously slow-draining. This is where a percolation test, or “perc test,” comes in. It’s a simple but vital test to measure your soil’s drainage rate.
You dig a few test pits, fill them with water, and time how long it takes for the level to drop.
- Slow drainage means you’ll need to space your trenches closer together.
- Faster drainage might mean you can use a less intensive layout.
This test gives you real-world data, turning your plan from guesswork into an evidence-based design. If you skip it, you risk installing a system that cannot cope with the local ground conditions.
Before you start the digger, careful planning goes a long way. Here’s a quick checklist to make sure you’ve covered all the bases.
Essential Pre-Installation Checklist
| Checklist Item | Key Action | Why It Matters |
|---|---|---|
| Visual Site Walk | Identify and map all waterlogged areas and visible issues. | Forms the basis of your drainage plan and targets the right spots. |
| Topographical Survey | Use a laser level or surveyor to map the land’s high and low points. | Ensures your trenches have the correct fall to let gravity do the work. |
| Percolation Test | Dig test pits and measure the soil’s drainage rate. | Determines trench spacing and the type of backfill aggregate needed. |
| Outfall Location | Identify a suitable discharge point (ditch, watercourse, soakaway). | Your entire system must drain somewhere; this is the most critical point. |
| Regulatory Checks | Contact the local Internal Drainage Board (IDB) and council. | Confirms if you need permits or consent, avoiding legal headaches. |
| Utility Mapping | Check for buried cables, pipes, and services. | Prevents dangerous and costly strikes during excavation. |
This checklist isn’t just about ticking boxes; it’s about building a robust, effective drainage solution from the ground up.
A well-executed plan, backed by a proper site assessment and percolation test, is the difference between a temporary fix and a permanent solution. It ensures the machinery, materials, and effort you invest will deliver the desired result.
Navigating Permits and Local Regulations
Before you finalise anything, you must check with the relevant authorities. Do not skip this step. Many drainage projects, especially those connecting to a watercourse or public system, need formal consent.
Here in the UK, Internal Drainage Boards (IDBs) are key players. There are 112 IDBs across England, managing water levels across 1.18 million hectares of land. For any work in Norfolk and Suffolk, talking to the local IDB is essential to make sure your outfall connection is compliant.
It’s also smart to contact your local council to see if planning permission is needed. A few phone calls upfront can prevent serious legal trouble and project delays.
Selecting Your Machinery and Materials
The long-term success of your land drainage system depends on two things: the quality of the materials you put in the ground and the machinery you use. Get these choices right from the start to prevent early failures and ensure your system works well for decades. It is all about matching the right equipment to the specific demands of your site.
Making the wrong choice can be costly. Using an underpowered digger can easily double your time on the job. Skimping on geotextile wrap in heavy clay soil is a recipe for a blocked system within a few years. Let’s break down the practical decisions you need to make for a professional job.
Choosing the Right Drainage Pipe
The backbone of any system is the perforated pipe, often just called a land drain. The most common type is a flexible, single-wall corrugated plastic pipe. It’s lightweight, easy to handle, and fine for most garden and agricultural projects.
However, if your project needs more rigidity or the drain runs under an area with vehicle traffic, a twin-wall pipe is a far better option. It has a smooth inner bore that improves flow rates and reduces the risk of sediment build-up. The outer wall is still corrugated, giving it plenty of structural strength.
The main things to consider are:
- Diameter: An 80mm or 100mm pipe is standard for lateral drains in gardens and small fields. For the main collector drains, you’ll need to step up to 150mm or 160mm to handle the extra volume.
- Perforations: Make sure the pipe is fully perforated to let water in from all directions. Always lay it with the perforation slots facing downwards – that’s a common mistake.
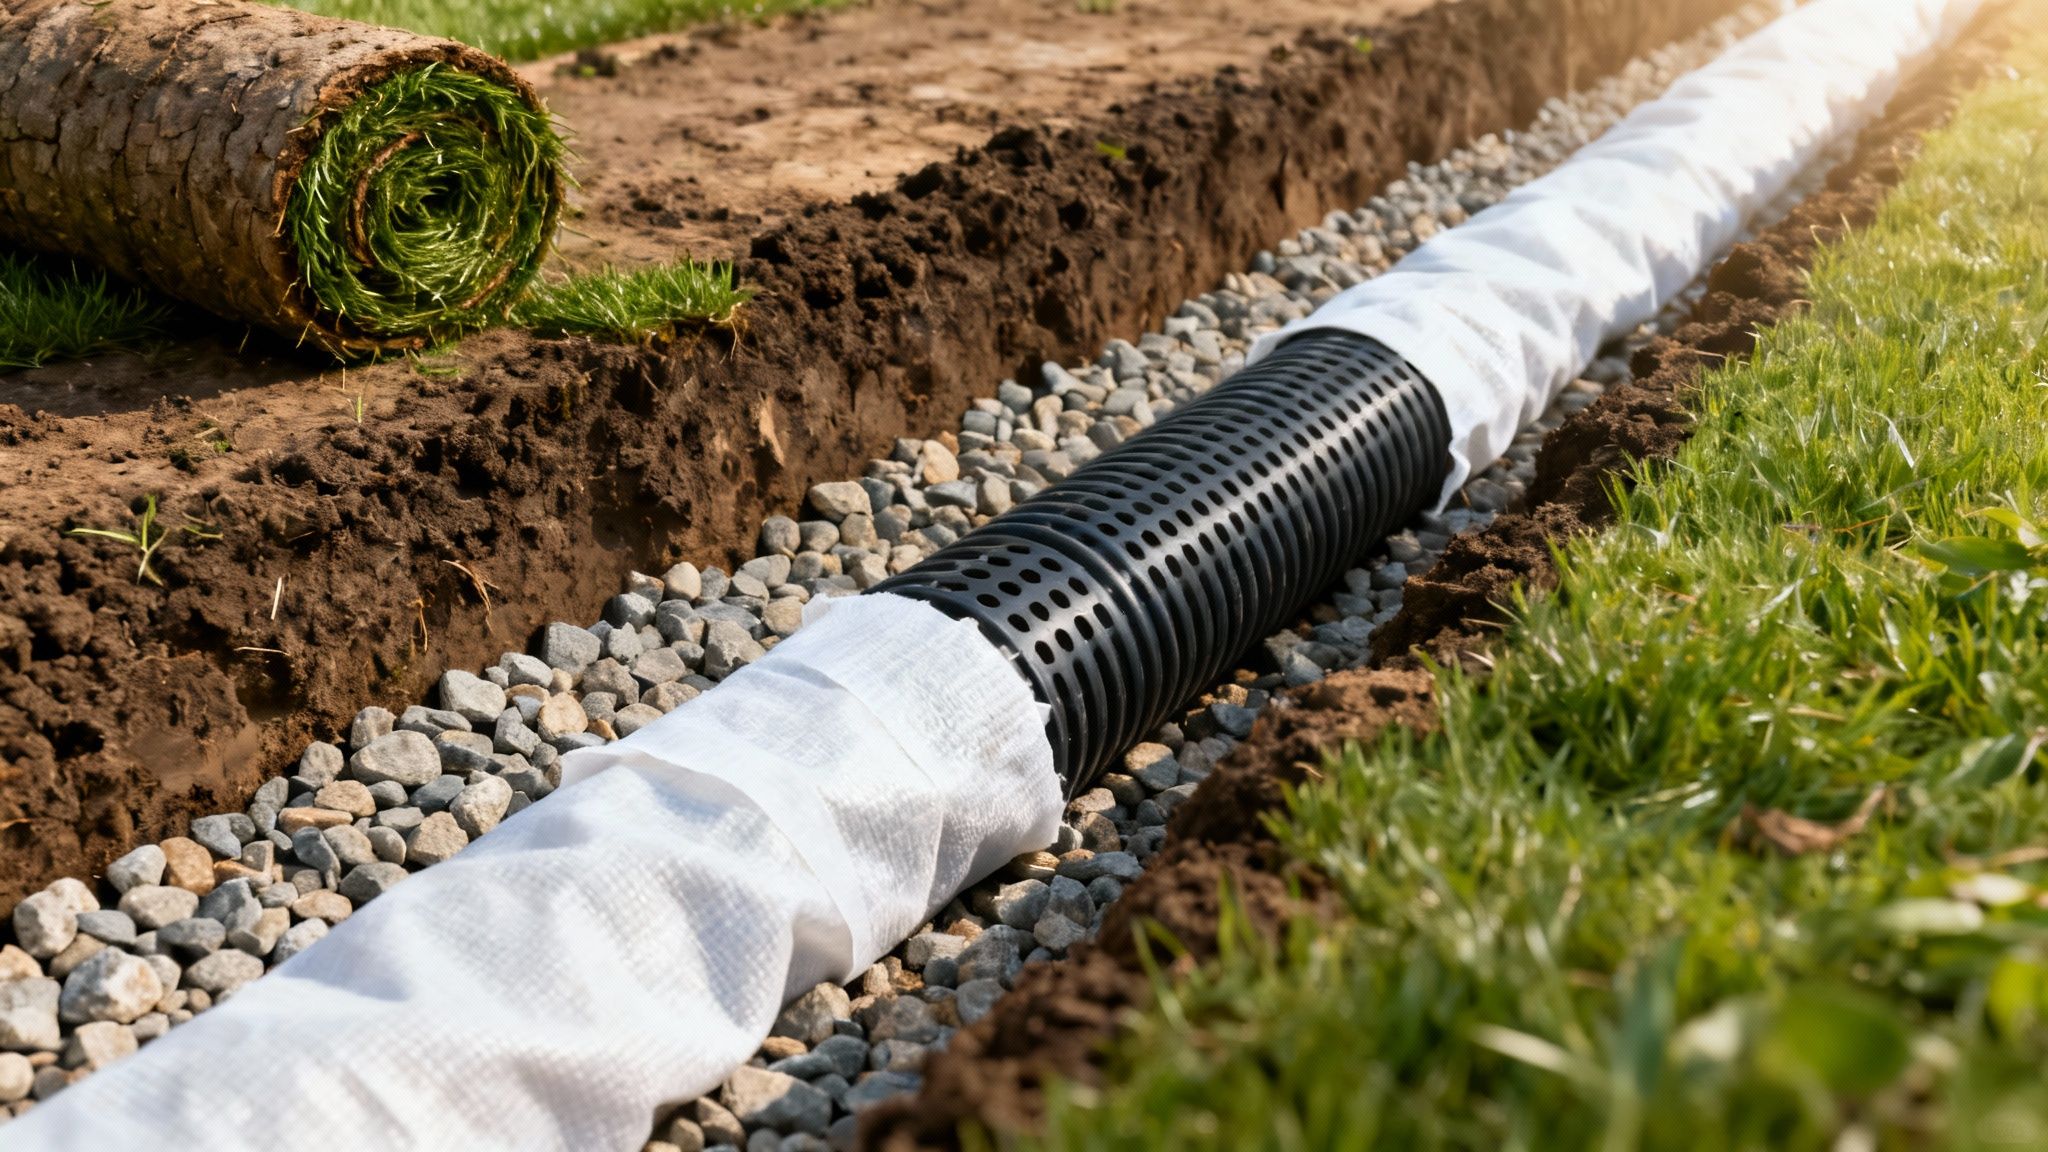
The Non-Negotiable Geotextile Wrap
In the clay-heavy soils across Norfolk and Suffolk, a non-woven geotextile membrane isn’t an optional extra; it’s essential. This fabric wrap acts as a filter. It stops fine silt and clay particles from getting into the pipe and clogging the entire system.
Without this protective layer, a process called siltation is inevitable. Water will slowly draw fine soil particles into your clean aggregate and then into the pipe. This gradually chokes it until the drain stops working. Wrapping the pipe in a geotextile sock or lining the entire trench with a membrane is the best insurance against this common failure.
Think of the geotextile membrane as the guardian of your system. It lets water pass through freely while holding back the fine soil particles that would otherwise choke your drainage pipe. It’s what ensures long-term, clog-free performance.
Selecting Your Aggregate and Backfill
The material you surround the pipe with is just as important as the pipe itself. Your goal is to create a highly permeable zone that lets water move easily from the surrounding soil into the drain.
A clean, single-sized aggregate is always the best choice. This means a 10mm or 20mm pea shingle or stone. Because the stones are all a similar size, they create large voids between them, leaving clear channels for water to flow. Avoid using “as-dug” gravel or anything with a mix of sand and fines, as this will compact and restrict water movement.
Matching Machinery to the Job
The plant you hire directly impacts how efficiently and precisely you can complete the installation. The scale of the project dictates what you’ll need. For more details on choosing the right machine, explore your options for local excavator hire.
- Mini Excavators (1.5 – 3 Tonnes): These are the workhorses for residential projects, gardens, and any site with tight access. Their compact size keeps ground disturbance to a minimum. They are nimble enough to get around established landscapes without causing chaos.
- Tracked Excavators (13 – 20 Tonnes): For large agricultural fields or commercial developments, you need a bigger machine. The precision you get with modern excavators, especially those with GPS guidance, allows for incredibly accurate trench grading over long distances.
- Site Dumpers: For any project bigger than a small garden, a site dumper is invaluable for moving aggregate and backfill. It will dramatically speed up the process compared to using wheelbarrows.
- Trenching Buckets: Using a narrow trenching bucket that matches your required trench width is a must. It minimises the amount of spoil you have to shift and the volume of aggregate you need for backfilling, saving you both time and money.
Excavating Trenches and Laying Pipework
Once your plan is finalised and materials are on-site, it’s time to start work. The success of your drainage system now hinges on precision and good technique. A small mistake during excavation or pipe-laying can lead to big problems later on, such as blockages, system failure, and costly rework.
This isn’t just about digging a hole. It’s about creating a perfectly graded, stable trench that will house the pipework and keep water flowing freely for years. The job needs the power of an excavator balanced with the care of accurate measurement.
Mastering the Gradient with a Laser Level
A gravity-fed drainage system is simple: water needs to flow downhill. That sounds obvious, but achieving a consistent, gentle slope over a long distance is a real skill. For most land drainage jobs, the ideal fall is between 1:100 and 1:200. This means a one-metre drop in depth for every 100 metres of pipe.
A laser level is your best friend here. Set it up at your highest point and attach a staff receiver to your excavator’s dipper arm. This gives the operator a live depth reading, letting them cut a perfect grade without any guesswork. It is a far more reliable method than using string lines and spirit levels, especially on uneven ground.
Efficient Trench Excavation
The right machine makes all the difference. For most agricultural drainage or larger domestic projects, a tracked excavator is the tool for the job. It gives you the power and stability you need. But the real trick to saving time and money is fitting it with the right bucket.
Always use a narrow trenching bucket that’s just a bit wider than your pipe and the surrounding shingle. If your bucket is too wide, you’re shifting extra spoil for no reason and you will have to buy more aggregate to backfill the trench. It’s a simple choice that directly affects your budget.
Preparing the Trench and Pipe Bedding
With the trench dug to the right depth and gradient, the next job is to create a good bed for the pipe. Never lay the pipe directly on the clay or soil at the bottom. It is often uneven and can have sharp stones that could damage the pipework.
Start with a 50-75mm bedding of clean, single-sized aggregate, like 10mm or 20mm pea shingle. This creates a smooth, level base that allows water to seep into the pipe from below. It also gives the pipe full support, preventing any sagging that could become a silt trap later on.
Field Tip: A classic mistake is laying perforated pipe with the slots facing up. The perforations must always face downwards. This lets rising groundwater enter the pipe easily and stops silt from washing down and clogging the holes from above.
The order you lay your materials in is crucial for the system to work properly.
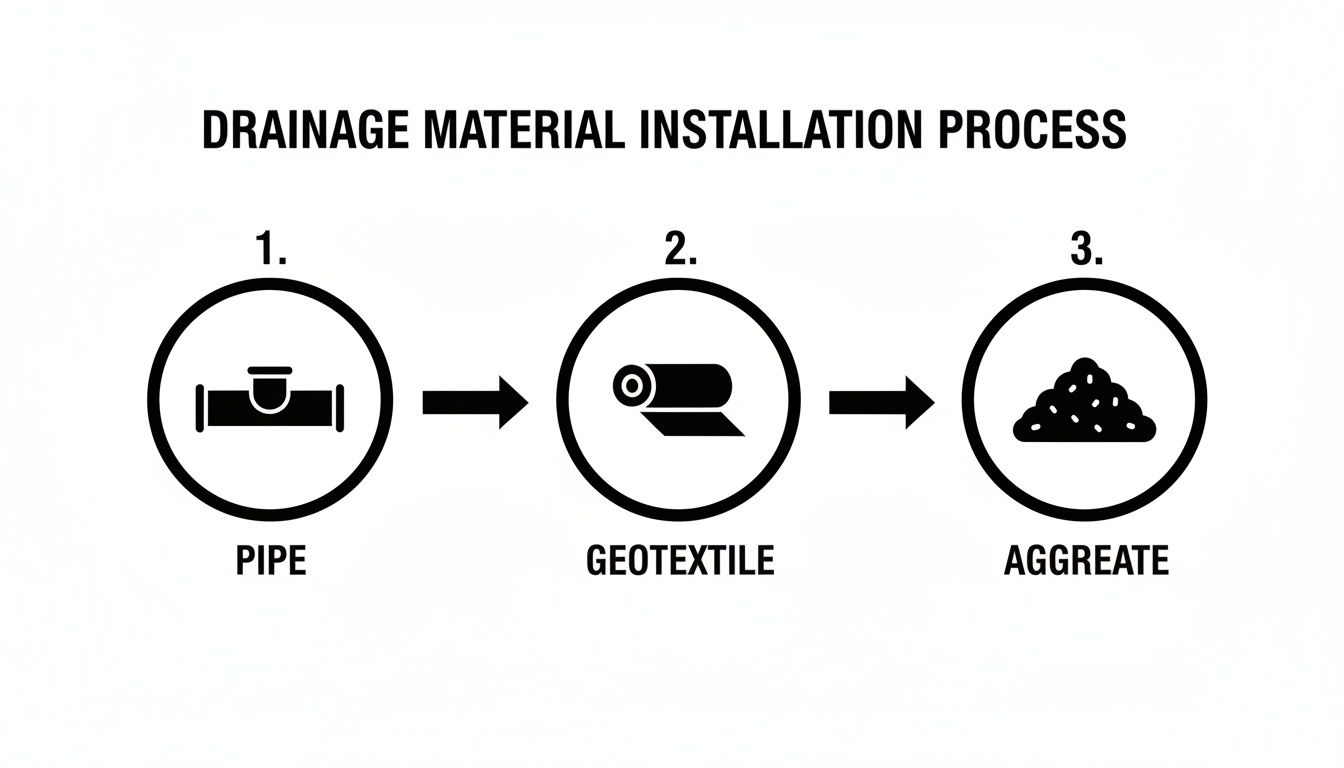
This sequence—pipe, geotextile wrap, then aggregate—creates a filter around the pipe, protecting it while allowing water to flow in freely.
Laying and Connecting the Pipework
With the shingle bed in place, you can start laying your perforated pipe. Always begin at the highest point of the system and work your way downhill towards the outfall. As you go, keep checking the gradient with the laser level to ensure everything stays on track. Make sure each length of pipe is pushed securely into the next using the correct couplers.
Remember to follow the core principles for a solid installation. Your site survey and percolation tests should have confirmed the ground is suitable, ideally with rates above 1×10^-5 m/s. This is especially important in the heavy clay soils of Norfolk and Suffolk. From there, it’s about executing the plan:
- Dig laser-levelled trenches to a 1:200 fall.
- Lay 100-160mm diameter perforated pipes.
- Space lateral drains at roughly 15m intervals in a grid (for fields) or herringbone (for gardens) pattern.
- Surround the pipes with 20-40mm shingle to about 150mm deep and top with soil.
For more technical background, you can often find useful information in the annual reports from DEFRA.
Finally, any connections to inspection chambers or the outfall itself need to be completely secure and watertight. Use the proper fittings for every joint. Any gaps are an invitation for roots to get in or weak points that could collapse. Once the pipe is laid and connected, you’re ready for backfilling.
Backfilling for Longevity and Performance
A drainage system can fail from a poor backfill just as easily as from a badly laid pipe. This final stage is about protecting your hard work. It ensures that water has a clear path to escape for years to come. Simply dumping the excavated clay and soil back into the trench is a recipe for disaster. It leads to compaction and blockages, making the entire system useless.
The correct approach involves a careful, multi-layered method. Each layer has a specific job, from protecting the pipe to ensuring water can move from the ground into your new drain. Getting this right turns a simple trench into a high-performance drainage solution that lasts.
The Critical First Layer Around the Pipe
Once your perforated pipe is bedded and wrapped in its geotextile membrane, the next layer is the most important. This is the primary filtration and collection zone, so the material you use here is critical.
You must surround the pipe with a clean, single-sized aggregate. Use a 10mm to 20mm pea shingle or stone. The uniform size creates large voids between the stones, forming a porous channel that allows water to flow freely into the pipe. This initial layer should cover the pipe by at least 150mm (6 inches) on all sides. This creates a protective cushion and a super-permeable core.
Do not be tempted to use “as-dug” gravel or any material containing sand, fines, or soil. These fine particles will eventually wash down, clog the voids in your aggregate, and ruin the system’s efficiency. The goal here is maximum permeability.
Building Up the Layers
With the initial shingle layer in place, you can start building up the rest of the backfill. The point of this next step is to stop the subsoil and topsoil from migrating down and choking your clean aggregate. This separation guarantees the system’s longevity.
If you lined the entire trench with geotextile before laying the pipe, now is the time to fold the excess fabric over the top of the shingle. This creates a complete ‘burrito’ wrap, protecting the clean stone from contamination from above. In the heavy clay soils often seen in Norfolk and Suffolk, this is best practice.
Next, you can add a more cost-effective material, like a coarser gravel or even the more granular subsoil you excavated earlier (as long as it’s not heavy clay). This acts as a transition zone between your clean aggregate and the final topsoil.
Compaction and Reinstating Topsoil
As you add each layer of backfill, it’s vital to compact it properly to prevent the trench from sinking later on. A sunken trench not only looks terrible but can disrupt surface water flow and even damage the pipework below.
For small, garden-sized trenches, a hand tamper might be enough. But for any agricultural or commercial job, you’ll need a powered compactor. Specialised trench rollers are essential for getting the right density. You should always compact the material in layers of around 150mm to 200mm to ensure the trench is solid from the bottom up.
The last step is reinstating the topsoil. I always recommend leaving the topsoil slightly proud of the surrounding ground, maybe by 25-50mm. This allows for natural settlement over the coming weeks and months, ensuring the trench eventually finishes flush with the rest of the surface.
The Final Flush Test
Before you pack up the tools and move the machinery off-site, there’s one last, crucial check: a flush test. This simple procedure confirms the entire system is clear, properly connected, and flowing correctly.
Just run a hosepipe into the highest inspection chamber or the upstream end of the drain for several minutes. Then, walk down to the outfall. You should see a strong, clear, and steady flow of water emerging. If the flow is weak or does not appear at all, you have a problem. It could be a blockage from installation debris or a collapsed connection.
Finding and fixing an issue now, while the digger is still on hand, is much easier and cheaper than returning to re-excavate a failed system later. Think of this final test as your ultimate quality assurance check.
Keeping Your Site Safe and Your System Running
Once the backfill is in, the job isn’t quite finished. Professionalism goes beyond the installation itself. It’s about managing a safe worksite from day one and leaving the client with a system that’s built to last. A well-laid drainage network still needs looking after, and any site with deep trenches and heavy machinery demands a serious approach to health and safety.
Getting both of these right separates a proper, long-term solution from a quick fix. It protects the land, the investment, and most importantly, the people on site.
Essential On-Site Safety Measures
Land drainage work is inherently risky. You are dealing with deep excavations and heavy plant, so managing those risks is not optional. A safe site is a productive site, and a few things are simply non-negotiable.
Trench safety has to be your number one priority. An unsupported trench can collapse in a heartbeat. That is why UK regulations are so clear: any trench deeper than 1.2 metres must be properly supported with shoring or trench boxes. Never let anyone work in a deep excavation that isn’t battered back or fully supported.
Operating machinery safely is just as vital.
- Set Up Exclusion Zones: Always mark out clear zones around excavators and dumpers. This keeps ground crew at a safe distance from swinging arms and moving vehicles.
- Do Your Daily Checks: Before starting any machine, operators must run through daily checks. Look for hydraulic leaks, worn parts, or anything wrong with safety features.
- Use Competent Operators: Make sure anyone operating machinery has the correct, up-to-date ticket for that specific piece of plant. No exceptions.
Your Responsibilities as a UK Contractor
Working as a contractor in the UK means you have a legal duty of care. A huge part of that is creating a safe system of work for everyone involved. This is not just about common sense; it requires clear documentation outlining the hazards and how you plan to control them.
A solid safety plan isn’t just about ticking boxes for compliance. It’s about building a culture where everyone on site understands the risks and knows how to work safely around deep trenches and heavy machinery.
For anyone taking on drainage projects, learning how to write a method statement is an invaluable skill. This document explains exactly how a job will be carried out safely and is often a requirement for commercial contracts, protecting you and your client.
Long-Term System Maintenance and Troubleshooting
With the system installed, a little regular upkeep will stop small issues from turning into big, expensive failures. The most common problems—silt build-up and root ingress—are usually easy to catch early if you know what you’re looking for.
The single most important check is a yearly look at the outfall. After heavy rain, you want to see a strong, clear flow of water. If it’s weak or nothing is coming out, that’s your first clue that there’s a blockage somewhere upstream. It’s also worth lifting the lids on any inspection chambers to check for silt or debris that needs clearing out.
Even with the best installation, problems can crop up over time. This quick guide should help you diagnose the usual suspects.
Troubleshooting Common Drainage Problems
Here’s a quick-reference table to help you identify and solve some of the most frequent issues you might encounter with an established land drainage system.
| Symptom | Likely Cause | Solution |
|---|---|---|
| Waterlogging Returns | Silt blockage in the pipe or aggregate. | Jet wash the system from an inspection chamber to flush out sediment. |
| Reduced Outfall Flow | Root ingress from nearby trees or hedges. | Use a drain rod with a cutting tool or, in severe cases, excavate and replace the affected section. |
| Sinkholes Along Trench | Poor backfill compaction or a collapsed pipe. | Excavate the affected area to inspect the pipe and re-compact the backfill in proper layers. |
This kind of proactive maintenance ensures the system keeps doing its job effectively, protecting the property and safeguarding the quality of your work for years to come.
Common Land Drainage Questions
When you’re planning a land drainage project, the same questions tend to pop up again and again. Getting clear answers on timing, materials, and regulations is vital before you break ground. Here are some of the most common queries we get from contractors and developers across the UK.
Getting these details right from the start separates a smooth-running project from a costly headache. A well-informed plan is the foundation of an effective drainage system.
What Is the Best Time of Year to Install Land Drainage?
The ideal time to install land drainage is during the drier months, usually from late spring to early autumn. There are practical reasons for this, as anyone who has tried to do it in winter will tell you.
Working on dry ground minimises soil compaction from heavy machinery like excavators and dumpers. Trying to run a digger across a waterlogged field in January, especially on the heavy clay soils in East Anglia, is a recipe for disaster. You end up with an unstable, muddy mess, and getting your levels right becomes almost impossible. Drier ground means cleaner trenches and a much lower risk of them flooding while you’re laying the pipe.
How Do I Choose the Right Size Drainage Pipe?
The pipe diameter you need depends on two things: the size of the area you’re draining and how much water you expect it to handle. While there is no single “one-size-fits-all” answer, there are some solid rules of thumb.
For most domestic gardens or small agricultural plots, an 80mm or 100mm diameter perforated pipe will do the job for the lateral drains. But for larger agricultural fields or commercial sites, you’ll need to think bigger. In those cases, using 150mm or 160mm pipes for the main collector drains is a much safer bet to cope with the sheer volume of water.
Always take the time to calculate the total catchment area. Underestimating the water flow and picking a pipe that’s too small is a classic mistake. It can lead to the whole system being overwhelmed after the first heavy downpour, undoing all your hard work.
Do I Always Need Planning Permission for Land Drainage?
This is a critical question, and the answer is not always simple. While some minor drainage work on agricultural land might fall under ‘permitted development’ rights, you should never assume that is the case.
You will almost certainly need formal consent if your system connects to a public sewer or a main river. It is also essential if your outfall discharges into a watercourse managed by an Internal Drainage Board (IDB). The safest, most professional approach is always to check with your local planning authority and the relevant IDB in Norfolk or Suffolk before you start digging. That simple check will keep you compliant and save you from potential fines or legal trouble.
For any land drainage project, having the right machinery is non-negotiable. From precision mini diggers for tight garden spaces to powerful tracked excavators for large-scale agricultural work, Aylsham Plant Solutions provides the modern, reliable plant hire needed to get the job done right. Explore our fleet and get expert advice for your next project in Norfolk or Suffolk by visiting us at https://aylshamplantsolutions.co.uk.
Related Posts